Standard access lists are sufficient if you want to filter on source IP address only. But if you want to filter on anything other than source address, you would have to configure an extended access list: numbered or named. Extended access lists can filter on source and destination IP addresses, or a combination of addresses and several other fields. If you prefer not to use a name, extended IP access lists can be numbered 100 – 199 or 2000 – 2699.
TCP/UDP Packet Matching
Standard access lists are protocol aware which means they can be used to match packets on the basis of layer 4 protocol. As you can see in the output below an extended access list can match packets on the basis of TCP, UDP, ICMP, EIGRP, and OSPF. In fact, you can even specify the protocol number found in the IP header to identify the higher layer protocol. It is useful if a keyword for the protocol you are trying to match is not available on your specific Cisco IOS Software release. You can find a complete list of assigned IP protocol numbers at http://www.iana.org/assignments/protocol-numbers/protocol-numbers.xml.
<0-255> An IP protocol number
ahp Authentication Header Protocol
eigrp Cisco’s EIGRP routing protocol
esp Encapsulation Security Payload
gre Cisco’s GRE tunneling
icmp Internet Control Message Protocol
igmp Internet Gateway Message Protocol
ip Any Internet Protocol
ipinip IP in IP tunneling
nos KA9Q NOS compatible IP over IP tunneling
ospf OSPF routing protocol
pcp Payload Compression Protocol
pim Protocol Independent Multicast
tcp Transmission Control Protocol
udp User Datagram Protocol
Table 9-7 Some Protocols in the Protocol Field of IP Header
| Protocol | Protocol Number |
| ICMP | 1 |
| TCP | 6 |
| UDP | 17 |
| IPv6 | 41 |
| GRE | 47 |
| EIGRP | 88 |
| OSPF | 89 |
| PIM | 103 |
You should especially be careful which layer 4 protocol to use when trying to match packets in extended access lists. For example, if you are trying to match telnet traffic, you would use tcp rather than udp keyword as shown below. Other examples of protocols running on TCP include Hyper-text Transfer Protocol (HTTP), File Transfer Protocol (FTP), and many more.
R1(config)#access-list 100 permit tcp any any eq www
R1(config)#access-list 100 permit tcp any any eq ftp
You may need to use udp keyword if the protocol you are trying to match runs on UDP. Examples of such protocols are Routing Information Protocol (RIP), Trivial File Transfer Protocol (TFTP), and Network Time Protocol (ntp) to name a few.
R1(config)#access-list 101 permit udp any any eq tftp
R1(config)#access-list 101 permit udp any any eq ntp
Standard access lists for TCP have another interesting matching criterion available in the form of established keyword.
You may recall that TCP uses a three-way handshake as part of TCP connection establishment. It is called three-way handshake because three TCP messages (SYN, SYN-ACK, and ACK) are exchanged between two hosts to establish a TCP connection. SYN and ACK each refers to a specific bit in the TCP header. The ACK bit is not set in the SYN message, the very first TCP message exchanged. However, the ACK bit is set in the other two messages of the three-way handshake as well all subsequent TCP messages. The established keyword simply tracks the ACK bit in the TCP header. An access list entry with established keyword matches all packets in a TCP session (provided other criteria are also met) other than the very first packet in which ACK bit is not set. But what’s the use of tracking this ACK bit? Let’s assume we apply an access list inbound to the Internet facing interface of our router, making use of the established keyword. It would prevent any inbound TCP connections from the Internet to your internal systems because the very first TCP message would be blocked. TCP connections from inside to the Internet would still be allowed. It acts as a basic security mechanism to protect your network.
ICMP Packet Matching
Internet Control Message Protocol (ICMP) provides messaging services to IP and works at the network layer. ICMP messages carried inside IP packets provide information about network problems.
Table 9-8 ICMP Message Types
| Keyword | Descirption |
| echo | Echo request (used to ping) |
| echo-reply | Echo reply (used to ping) |
| host-unreachable | The packet was delivered to the destination network but could not be sent to the specific host with destination IP address. |
| net-unreachable | The packet could not be delivered to the destination network. It usually indicates a routing issue. |
| port-unreachable | The destination port specified in the TCP or UDP header was invalid for the host to which the packet was sent. |
| protocol-unreachable | The protocol specified in the IP header was invalid for the host to which the packet was sent. |
| ttl-exceeded | Time-to-live (TTL) expired while packet was in transit. |
Extended access lists can be used to match specific ICMP message types based on protocol number of several keywords available on the Cisco IOS. You can find out which keywords are available as shown below in abridged output from Cisco CLI:
<0-255> ICMP message type
echo Echo (ping)
echo-reply Echo reply
host-unreachable Host unreachable
net-unreachable Net unreachable
port-unreachable Port unreachable
protocol-unreachable Protocol unreachable
ttl-exceeded TTL exceeded
<cr>
Access list statements can use either one of available keywords or numeric ICMP message type to match specific types of ICMP packets. A complete list of ICMP message types can be found at http://www.iana.org/assignments/icmp-parameters/icmp-parameters.xml.
Creating a Numbered Extended Access List
Extended access lists can be created using a number in the 100 – 199 or 2000 – 2699 range. In terms of functionality, numbered and named extended access lists can be used to achieve the same results; however they have differences in syntax.
Figure 9-4 Extended, Numbered Access List Example
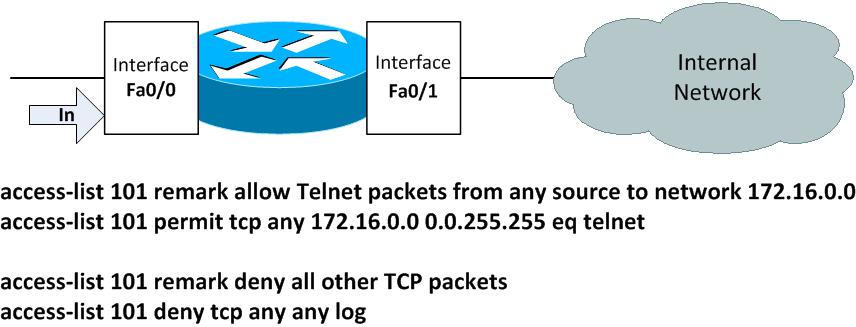
If you want to filter traffic using any criteria other than source IP address, an extended access list is needed. We will now show you how to configure a numbered extended access list one step at a time:
<1-99> IP standard access list
<100-199> IP extended access list
<1100-1199> Extended 48-bit MAC address access list
<1300-1999> IP standard access list (expanded range)
<200-299> Protocol type-code access list
<2000-2699> IP extended access list (expanded range)
<700-799> 48-bit MAC address access list
dynamic-extended Extend the dynamic ACL absolute timer
rate-limit Simple rate-limit specific access list
At the moment, we are interested in creating an extended numbered access list. So we can choose a number from the ranges 100-199 or 2000-2699.
deny Specify packets to reject
permit Specify packets to forward
remark Access list entry comment
We have chosen 101 as our extended access list number and there are three keywords available now, as you can see from above output. Let’s first add a user-friendly remark as usual in order to make our access list more readable as we return to it at a later point in time.
As you may have guessed from the remark, we are going to create an access control entry that would allow Telnet traffic sourced from anywhere destined for the network 172.16.0.0. We use the wildcard mask 0.0.255.255 for our class B network 172.16.0.0.
We used the telnet keyword to specify the application. However we could also use the port number 23 reserved for Telnet to achieve the same result. The alternate configuration would look something like the output below:
Let’s move on to create our next access control entry denying all other TCP packets creating a remark first as usual.
R1(config)#access-list 101 deny tcp any any log
We intend to not only deny access all other TCP packets, but also to log any such packets using the log keyword at the end of the statement.
At this point, the access list has actually been created and the same can be verified. This access list would be visible in the running configuration of the router when you use the command show running-config using the include keyword to filter output showing only those lines in the running configuration that contain the access-list 101 arguments.
access-list 101 remark allow Telnet packets from any source to network 172.16.0.0
access-list 101 permit tcp any 172.16.0.0 0.0.255.255 eq telnet
access-list 101 remark deny all other TCP packets
access-list 101 deny tcp any any log
R1#
Another useful command to verify access lists is show access-lists:
Extended IP access list 101
10 permit tcp any 172.16.0.0 0.0.255.255 eq telnet
20 deny tcp any any log
R1#
Though the access list has been created now, it is sitting idle doing nothing. As it has actually not been applied to any interface to have functionality. Let’s go ahead and apply it to interface Fa0/0 in the inbound direction as depicted in Figure 9-4.
The command to apply an access list to an interface is ip access-group entered in interface configuration mode:
R1(config)#int Fa0/0
R1(config-if)#ip access-group 101 ?
in inbound packets
out outbound packets
R1(config-if)#ip access-group 101 in
R1(config-if)#
We have applied the access list in the inbound direction filtering packets coming into the interface from outside. The access list is now applied comparing all packets received on interface Fa0/0 against entries in access list 101 and taking a permit or deny action as appropriate.
Creating a Named Extended Access List
A standard, named access lists can be used if you need to filter on source and destination IP address or a combination of addresses and other fields. There is no difference between numbered and named access lists in terms of functionality; however each has its own syntax.
We will define an extended named access list including one permit statement and one deny statement. The actual statements you use and their order would depend on your filtering requirements. You should define your permit and deny statements depending on what you want to allow or block.
Let’s first enter the privileged exec mode using enable command, and move to the global configuration mode using configure terminal command.
R1#configure terminal
Enter configuration commands, one per line. End with CNTL/Z.
The command used to define a named access list is ip access-list for both standard and extended access lists:
extended Extended Access List
log-update Control access list log updates
logging Control access list logging
resequence Resequence Access List
standard Standard Access List
We are interested here in the option extended used to defined extended access lists. We will proceed to define an extended access list named NoSales.
Let’s now define access list statements preceded by remarks to make their meaning clear. The first remark reminds the network administrator that the following entry denies access to the Sales network.
In the first access list statement, packets from the Sales network 172.18.0.0 are denied access to host 172.16.40.10 also logging all such packets.
We have to add another access list statement that allows all TCP packets from any source to any destination. We would also add a remark preceding this access lists statement as usual.
R1(config-ext-nacl)#permit tcp any any
Remember that all sources not specifically permitted are denied by an implicit deny statement at the end of the access list.
And let’s have a look at the figure before applying the access list to an interface.
Figure 9-5 Extended, Named Access List Example
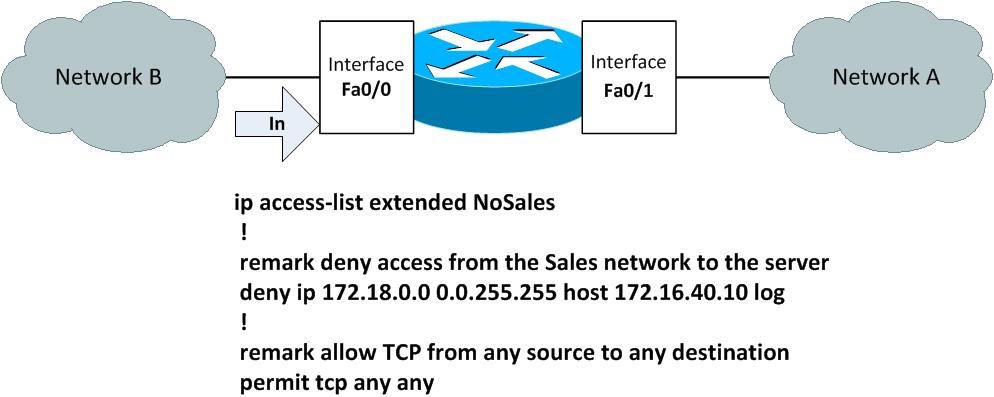
Finally, let’s apply the access list to interface Fa0/0 in the inbound direction as shown in the figure.
R1(config-if)#ip access-group NoSales in
R1(config-if)#
Finally, we can display the access list using the good old show access-list command.
Extended IP access list NoSales
10 deny ip 172.18.0.0 0.0.255.255 host 172.16.40.10 log
20 permit tcp any any
R1#
This completes our coverage of access lists full with examples of standard and extended access lists in the numbered and named format. We also provided a bunch of hints that will help you create access lists in practice.