Types of Routing
To be able to route a packet, a router must know at least the following:
- Destination address to where the packet is destined. Layer 3 protocols such an IP take care of this.
- Neighboring routers from which remote networks can be learned of and packets can be moved to on way to its destination.
- Routes to remote networks and a way to determine the best route to each of them.
- Way to learn, verify and manage routing information. Incomplete, incorrect or unstable routing information is worse than not having any routing information. If a router does not have routing information, it will drop the packets and let the source know. If a router has incorrect routing information, loops can form and bring down networks.
As you would have realized by now, the essence of routing is how the router learns about the remote networks. Routing information is stored in the routing table also called the Routing Information Base (RIB). The RIB consists of routes to destination networks. Each route is a combination of the destination network address, subnet mask and the next hop towards the destination. There are three ways for a router to learn routes:
- Static Routing – This is the method by which an administrator manually adds routes to the routing table of a router. This is a method for small networks but it is not scalable for larger networks.
- Default Routing – This is the method where all routers are configured to send all packets towards a single router. This is a very useful method for small networks or for networks with a single entry and exit point. It is usually used in addition to Static and/or Dynamic routing.
- Dynamic Routing – This is the method where protocols and algorithms are used to automatically propagate routing information. This is the most common method and most complex method of routing. Each routing protocol can have chapters or even whole books written about then. Most of them have one or more RFCs dedicated to them. In fact, the whole of the next chapter is dedicated to dynamic routing.
The following sections look at each of these routing types while implementing the first two types in our example network.
Static Routing
When you manually add routes to the routing table, it is called static routing. There are advantages and disadvantages in using static routing. The advantages are:
- There is no overhead in terms of CPU usage of the router as well as bandwidth between routers. When dynamic routing is used, packets are exchanged between routers and that uses bandwidth. That can be costly when they traverse across WAN links. The routers also need to process these packets and that consumes some CPU cycles as well.
- It adds a certain degree of security since the administrator controls which routes the routers can know and learn.
The disadvantages of static routing are:
- The administrator needs to know the internetwork so well that he/she knows where each destination network lies and which is the next hop towards it.
- Every change needs to be manually done on each router in the internetwork.
- In large networks this can be unmanageable.
To add a static route, use the following command in the global configuration mode:
As you can see, the command is pretty simple. You need to specify the destination network address, its mask and the address of the next hop towards the destination. You can also specify the exit interface instead of the next hop address. Using the exit interface will cause the router to reply or ARP query and response from the next hop router and is not generally recommended.
Figure 4-2 Static Routing
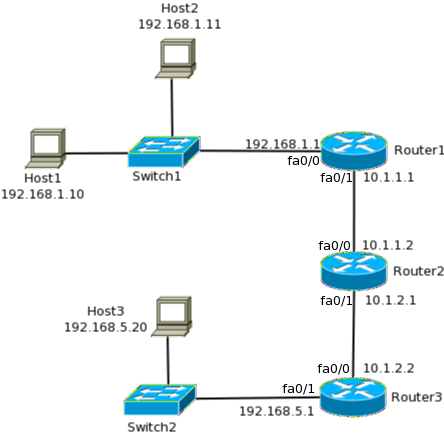
Let us configure our example network shown in Figure 4-2 (Figure 4-1 is repeated as Figure 4-2 so that you it is easier to understand), using static routing. To configure static routing, you need to look at the path traffic will taken from source to destination and back from destination to source. Each router in the path should know the source and destination network. So assuming our source is in network 192.168.1.0/24 (Host1) and our destination is in 192.168.5.0/24 network (Host3), let us look at the source to destination path, which is Router1->Router2->Router3.
- Router1 does not know about the destination network. So we need to add a route. The next hop for Router1 towards the destination is Router2’s fa0/0 interface. The route can be added using the following command:Router1(config)#ip route 192.168.5.0 255.255.255.0 10.1.1.2
- Router2 also does not know about the destination network. So we need to add a route telling it that the next hop towards 192.168.5.0/24 is Router3’s fa0/0 interface. The following command can be used to add the route:Router2(config)#ip route 192.168.5.0 255.255.255.0 10.1.2.2
- Router3 knows the destination network since it is directly connected to it. So a route need not be added.
Following the path back from the destination to source, which is Router3->Router2->Router1:
- Router3 does not know the 192.168.1.0/24 network, so a route should be added using the following command:Router3(config)#ip route 192.168.1.0 255.255.255.0 10.1.2.1
- Router2 also does not know the 192.168.1.0/24 network, so a route should be added using the following command:Router2(config)#ip route 192.168.1.0 255.255.255.0 10.1.1.1
- Router1, being directly connected to 192.168.1.0/24, knows about the network already.
To view the routing table and verifying static routing, you can use the show ip route command. The output from all three routers in our example is given below:
Router1#sh ip route
Codes: C – connected, S – static, R – RIP, M – mobile, B – BGP
D – EIGRP, EX – EIGRP external, O – OSPF, IA – OSPF inter area
N1 – OSPF NSSA external type 1, N2 – OSPF NSSA external type 2
E1 – OSPF external type 1, E2 – OSPF external type 2
i – IS-IS, su – IS-IS summary, L1 – IS-IS level-1, L2 – IS-IS level-2
ia – IS-IS inter area, * – candidate default, U – per-user static route
o – ODR, P – periodic downloaded static route
Gateway of last resort is not set
S 192.168.5.0/24 [1/0] via 10.1.1.2
10.0.0.0/24 is subnetted, 1 subnets
C 10.1.1.0 is directly connected, FastEthernet0/1
C 192.168.1.0/24 is directly connected, FastEthernet0/0
Router2#sh ip route
-output truncated–
S 192.168.5.0/24 [1/0] via 10.1.2.2
10.0.0.0/24 is subnetted, 2 subnets
C 10.1.2.0 is directly connected, FastEthernet0/1
C 10.1.1.0 is directly connected, FastEthernet0/0
S 192.168.1.0/24 [1/0] via 10.1.1.1
Router3#sh ip route
-output truncated–
Gateway of last resort is not set
C 192.168.5.0/24 is directly connected, FastEthernet0/1
10.0.0.0/24 is subnetted, 1 subnets
C 10.1.2.0 is directly connected, FastEthernet0/0
S 192.168.1.0/24 [1/0] via 10.1.2.1
Though the output of the show ip route command will be discussed in detail later in the chapter and in the next chapter, here are a few things you need to know now:
- The letter at the start of each line shows how the router was learned. The meaning of each letter is given at the beginning of the output as can be seen form the output from Router1. C stands for directly connected routes. These are the networks to which the router is directly connected. S stands for static routes. As you can see, the routes that you added are shown in lines that start with S.
- You should verify the network and subnet mask in the output to see if you typed the correct information.
- The IP address after “via” shows the next hop address for this destination.
The outputs show that all the routes that you added above have taken effect and traffic can flow between the 192.168.1.0/24 and 192.168.5.0/24 networks in both directions now. You may have noticed that Router1 still does not know about the network between Router2 and Router3 (10.1.2.0/24) and Router3 does not know about the network between Router1 and Router2 (10.1.1.0/24). Though it is not necessary for them to know about these networks, from a troubleshooting perspective it better to add routes for these networks also as shown below:
Router1(config)#ip route 10.1.2.0 255.255.255.0 10.1.1.2
Router3(config)#ip route 10.1.1.0 255.255.255.0 10.1.2.1
After these routes are added, the example network has complete reachability using static routing.
Default Routing
Default routing can be considered a special type of static routing. The difference between a normal static route and a default route is that a default route is used to send packets destined to any unknown destination to a single next hop address. To understand how this works, consider Router1 from our example (Figure 4-2), without any static routes in it. When it receives a packet destined to 192.168.5.0/24 it will drop it since it does not know where the destination network is. If a default route is added in Router1 with next hop address of Router2, all packets destined to any unknown destination, such as 192.168.5.0/24 will be sent to Router2.
Default routes are useful when dealing with a network with a single exit point. It is also useful when a bulk of destination networks have to be routed to a single next-hop device. When adding a default route, you should ensure that the next-hop device can route the packet further, or else the next hop device will drop the packet.
Another point to remember is that when a more specific route to a destination exists in the routing table, the router will use that route and not the default route. The only time the router will use the default route is when a specific route does not exist.
The command to add a default route is same as that of adding a static route, but with the network address and mask set to 0.0.0.0 as shown below:
In our example network, the only exit point for the 192.168.1.0/24 and 192.168.5.0/24 networks is towards Router2. Hence, we can remove the static routes from Router1 and Router3 and add default routes as shown below:
Router1(config)#no ip route 10.1.2.0 255.255.255.0 10.1.1.2
Router1(config)#no ip route 192.168.5.0 255.255.255.0 10.1.1.2
Router1(config)#ip route 0.0.0.0 0.0.0.0 10.1.1.2
Router3(config)#no ip route 10.1.1.0 255.255.255.0 10.1.2.1
Router3(config)#no ip route 192.168.1.0 255.255.255.0 10.1.2.1
Router3(config)#ip route 0.0.0.0 0.0.0.0 10.1.2.1
Remember that since Router2 has multiple exists, you cannot use default routing there. It still needs the static routes.
Take a look at the routing table on Router1 and Router3 after the above changes:
Router1#sh ip route
–output truncated–
Gateway of last resort is 10.1.1.2 to network 0.0.0.0
10.0.0.0/24 is subnetted, 1 subnets
C 10.1.1.0 is directly connected, FastEthernet0/1
C 192.168.1.0/24 is directly connected, FastEthernet0/0
S* 0.0.0.0/0 [1/0] via 10.1.1.2
Router3#sh ip route
–output truncated–
Gateway of last resort is 10.1.2.1 to network 0.0.0.0
C 192.168.5.0/24 is directly connected, FastEthernet0/1
10.0.0.0/24 is subnetted, 1 subnets
C 10.1.2.0 is directly connected, FastEthernet0/0
S* 0.0.0.0/0 [1/0] via 10.1.2.1
In the above output notice that the static route to 0.0.0.0/0 is now seen in the routing table. Apart from that, the gateway of last resort is now the next-hop as specified in the default route.
A second way of adding a default route would be to specify the exit interface instead of the next-hop address. For example, on Router1, you can use the following command instead of the one used above:
Router1(config)#ip route 0.0.0.0 0.0.0.0 fa0/0
This tells the route to forward all packets, destined to unknown destinations, out fa0/0. While this will accomplish the same thing, the big difference is that a static route with an exit interface specified will take preference over a static route with next-hop specified. This is because the administrative distance of a route with exit interface is lower than the other one. Administrative distance is covered later in the chapter.
A third way of defining a default route is using the ip default-network command. Using this command you can tell the router to use the next-hop address of a known network as the gateway of last resort. For example, on Router1, you can use the following two commands to set the gateway of last resort:
Router1(config)#ip default-network 10.1.2.0
The second command will cause the router to lookup the route to 10.1.2.0 and use 10.1.1.2 (next-hop address for 10.1.2.0) as the gateway of last resort.
The routing table will look as shown below, after the above two commands are entered:
Router1#sh ip route
Codes: C – connected, S – static, R – RIP, M – mobile, B – BGP
D – EIGRP, EX – EIGRP external, O – OSPF, IA – OSPF inter area
N1 – OSPF NSSA external type 1, N2 – OSPF NSSA external type 2
E1 – OSPF external type 1, E2 – OSPF external type 2
i – IS-IS, su – IS-IS summary, L1 – IS-IS level-1, L2 – IS-IS level-2
ia – IS-IS inter area, * – candidate default, U – per-user static route
o – ODR, P – periodic downloaded static route
Gateway of last resort is 10.1.1.2 to network 10.1.2.0
S 10.1.2.0/24 [1/0] via 10.1.1.2
10.0.0.0/24 is subnetted, 1 subnets
C 10.1.1.0 is directly connected, FastEthernet0/1
C 192.168.1.0/24 is directly connected, FastEthernet0/0
The difference between using the ip route command and the ip default-network command for adding a default route is that the route added using ip route command is local and does not get propagated through a routing protocol, if one is enabled. The route added through the ip default-network command will get propagated by a routing protocol.
Another thing to remember is that prior to IOS version 12.4, the ip classless command was not enabled by default. You will remember from Chapter 2, that if the ip classless command is not used, the router will do classful routing and expect a default mask on each interface. A side effect of this command not being present is that if the destination network is not in the routing table, the router will drop the packet. If you are using default routing, it is possible that you do not have any specific routes in the table. So you must enable classless routing using the ip classless command for default routing to work.
Dynamic Routing
Dynamic routing is when protocols, called routing protocols, are used to build the routing tables across the network. Using a routing protocol is easier than static routing and default routing, but it is more expensive in terms of CPU and bandwidth usage. Every routing protocol defines its own rules for communication between routers and selecting the best route.
Routing protocols are broadly classified as Interior Gateway Protocols (IGP) or Exterior Gateway Protocols (EGP). IGPs are used to exchange routing information within internetworks that fall under a single administrative domain (also called Autonomous Systems). EGPs on the other hand are used to exchange routing information between different autonomous systems. Common examples of IGPs are Routing Information Protocol (RIP), Enhanced Interior Gateway Routing Protocol (EIGRP) and Open Shortest Path First (OSPF). These are covered in detail in the next chapter. On the other hand, Border Gateway Protocol (BGP) is an example of EGP. It is the protocol used for routing information exchange on Internet. It is beyond the scope of CCNA, hence we will not cover it in this book.
While the next chapter covers the IGPs in detail, the rest of this chapter is dedicated to basics of routing protocols that are necessary for you to understand before looking into specific protocols.